Joint Roller And Grinder: Making Your Preparation Simple Today
Preparing your materials for a session can, it's almost, be a bit of a process, can't it? Many people find themselves looking for ways to make things easier, perhaps less messy, and certainly more consistent. This desire for simplicity, you know, often leads folks to think about tools that can help streamline their routine, making the whole experience a lot more enjoyable, really.
That's where a combined joint roller and grinder comes into the picture, as a matter of fact. It's a single item, in a way, that handles two very important steps in your preparation. This kind of tool helps bring together what might otherwise be separate actions, making them feel more connected, so to speak, and certainly more efficient for anyone wanting a smooth setup.
Think about how the human body works, for instance. Joints, as we know, are these incredible points of contact between different parts of the skeleton. They allow for movement, they give us stability, and they help with overall function, actually. Similarly, a joint roller and grinder creates a kind of "joint" or connection point between your raw material and the final, ready-to-use product. It facilitates the "movement" from preparation to enjoyment, bringing a certain "stability" to your rolling process, allowing for a wide range of motions in your routine, from simple grinding to complex rolling actions, all in one place. This integration, you see, is all about making things work together better.
Table of Contents
- What Exactly is a Joint Roller and Grinder?
- Why Combine a Grinder and Roller?
- Types of Joint Roller and Grinder Combos
- How to Use Your Joint Roller and Grinder
- Picking the Right Joint Roller and Grinder for You
- Keeping Your Tool Clean
- Common Questions About Joint Rollers and Grinders
What Exactly is a Joint Roller and Grinder?
A joint roller and grinder, basically, is a device that brings together two distinct functions into one handy unit. On one side, or perhaps within one chamber, you have a mechanism designed to break down your dry material into a finer consistency. This part, you know, is the grinder. It typically features sharp teeth or blades that shred and pulverize the material, getting it ready for the next step, which is rather important for a smooth experience.
Then, in the same device, there's a section specifically for rolling. This part, actually, is the joint roller. It usually consists of a set of rollers or a rolling mechanism that helps you shape your material into a neat, cylindrical form, ready for use. The idea, you see, is to make the entire preparation process as seamless as possible, from start to finish, without needing multiple tools scattered about. It's about efficiency, in a way, and making things just a little bit simpler for you.
The design of these combined tools can vary quite a bit, honestly. Some might look like a traditional grinder with a small rolling machine built into the base or lid. Others could be more integrated, where the grinding action directly feeds into the rolling chamber. The goal, however, remains the same for all of them: to provide a convenient, all-in-one solution for preparing your material. This integration, you know, is really what makes these devices stand out for many people seeking a more straightforward approach to their routine, especially today, October 26, 2023.
Why Combine a Grinder and Roller?
Combining a grinder and a roller into a single tool offers several clear advantages for anyone who regularly prepares material, you know. One of the biggest benefits, arguably, is the sheer convenience it provides. Instead of juggling two separate items, perhaps misplacing one, or having to clean multiple pieces, everything you need is right there in one place. This makes the whole process faster and, quite frankly, a lot less of a hassle.
Space saving is another pretty significant factor, as a matter of fact. If you're someone with limited counter space, or if you prefer to keep your setup discreet and tidy, a combined unit takes up much less room than individual tools. It's also, you know, easier to store and transport. This means you can take your preparation tools with you more easily, whether you're moving from room to room or heading out for a trip, which is very practical.
Furthermore, these integrated devices often lead to a more consistent result. When your material is ground and then immediately fed into the roller, there's less chance for it to dry out, or get unevenly distributed. This helps ensure that your final product is consistently well-prepared, which, honestly, can make a big difference in the overall experience. It’s about creating a smooth flow, from breaking down the material to getting it ready, all within one seamless action, just a little bit like how different parts of a joint in your body work together for one fluid motion.
Consider the reduction in mess, too. With fewer individual components, there are fewer surfaces for material to spill or stick to. This means less cleanup time for you, and a generally cleaner preparation area, which is always a good thing, right? It streamlines your entire routine, allowing you to focus more on enjoying your session and less on the preparatory steps, which, for many, is a major plus. It's about simplifying, basically, the whole experience.
Types of Joint Roller and Grinder Combos
When you start looking into joint roller and grinder combinations, you'll notice there are, actually, a few different types available. Each design, in a way, tries to solve the same problem of convenience but approaches it from a slightly different angle. Knowing these differences can help you pick the one that best fits what you're looking for, which is pretty important.
One common type is the "grinder with an integrated rolling machine." These often look like a standard multi-chamber grinder, but one of the chambers, or perhaps the base, houses a small rolling mechanism. You grind your material first, then, in some cases, you might transfer it to the rolling section. Other designs allow the ground material to fall directly into the rolling area, which is pretty clever, you know. This type is generally compact and very portable, making it a favorite for many.
Then there are, you know, "all-in-one kits" that come in a single case or container. These aren't always a single, fused device, but rather a collection of tools—a grinder, a roller, perhaps some storage for papers, and maybe even a packing tool—all neatly organized within one box. While not a single unit, they offer the convenience of having everything together in one place, which is still very useful for keeping things tidy and accessible. This setup is good for someone who wants everything organized but might prefer separate tools for individual tasks, in a way.
You also find, sometimes, "automatic or semi-automatic" versions. These are often a bit more sophisticated. An automatic grinder and roller might, arguably, handle both the grinding and the rolling with minimal effort from you, perhaps just by pressing a button. Semi-automatic versions might require you to load the material and paper, but then the machine does the actual rolling. These are great for those who want maximum ease of use or who might have difficulty with manual rolling, which is a very practical consideration for some users. They tend to be larger and, you know, might be less portable than the simpler manual versions.
Finally, there are "specialty or novelty" combos. These might incorporate other features, like storage compartments, or be designed with unique aesthetics. They might not always be the most practical for everyday use, but they can be fun additions for collectors or those who appreciate unique designs. The variety, you see, means there's probably something out there for almost everyone, depending on their specific needs and preferences, which is pretty cool.
How to Use Your Joint Roller and Grinder
Using a joint roller and grinder combo is, actually, quite straightforward once you get the hang of it, you know. The exact steps might vary a little bit depending on the specific model you have, but the general idea remains consistent across most of them. It's about a smooth flow from one step to the next, just like how different parts of your body work together when you're moving around.
Grinding Your Material
First things first, you'll need to prepare your material for grinding. Open the grinding chamber of your device. This is typically the top section, or perhaps a dedicated compartment. Place your dry material inside, making sure not to overfill it, as a matter of fact. Overfilling can make the grinding process less efficient and might even jam the mechanism, which you definitely want to avoid, right? Once loaded, close the lid securely. Now, you know, twist the top and bottom parts of the grinder in opposite directions. You'll feel the material breaking down. Continue twisting until you reach your desired consistency. Most people prefer a fine, fluffy grind for rolling, but it's really up to your personal preference, in a way. Some grinders might have a small crank handle instead of requiring twisting, which can be a bit easier for some users.
Transferring and Loading
After grinding, you'll need to get the material into the rolling section. For some combined units, the ground material might fall directly into the rolling chamber, which is pretty convenient. For others, you might need to open a separate compartment or carefully transfer the ground material from the grinder to the roller. Once the material is in the rolling section, make sure it's distributed evenly along the length of the roller. This step is pretty crucial for getting a well-shaped final product, you see. If the material is bunched up in one spot, your roll will likely be uneven, which nobody really wants, do they?
Inserting the Paper
Now comes the paper. Take your rolling paper and, typically, insert it into the gap between the rollers, with the gummed edge facing up and away from you. This is a very common way to do it. You'll want to make sure the paper is straight and centered. Some rollers have a specific slot or guide for the paper, which makes this step a bit easier. The goal is to get the paper positioned so it will wrap around the material evenly as you roll, which is, honestly, a key part of the process.
The Rolling Action
With the material and paper in place, it's time to roll. For most manual rollers, you'll bring the two rollers together, or perhaps close a lid, and then begin to roll them downwards with your thumbs. This action, you know, pulls the paper and material into the rolling mechanism, shaping it into a cylindrical form. As the paper starts to wrap, you'll moisten the gummed edge, usually with your tongue, and then complete the roll. The gummed edge will stick, sealing your creation. You might need to practice this a few times to get the tension and speed just right, but it's surprisingly simple once you get the feel for it. For automatic or semi-automatic versions, you might just press a button or pull a lever to complete the roll, which is pretty neat.
Finishing Up
Once rolled, carefully remove your finished product from the roller. It should be a neat, firm, and ready-to-use item. Take a moment to admire your handiwork, as a matter of fact! Some people like to gently tap the end to settle the material further. And that's it, you know. You've gone from raw material to a perfectly prepared item, all with one handy tool. It's a pretty satisfying process, honestly, especially when it works smoothly every time.
Picking the Right Joint Roller and Grinder for You
Choosing the right joint roller and grinder is, honestly, a bit like picking any other personal tool; it really comes down to your individual needs and how you plan to use it. There are, actually, quite a few options out there, so taking a moment to think about what matters most to you can make a big difference in your satisfaction, you know.
Consider Your Usage
First, think about how often you'll be using it. If you're an occasional user, a simpler, more basic model might be perfectly fine. These are often less expensive and, you know, still get the job done effectively. However, if you're a frequent user, investing in a more durable and perhaps more feature-rich model could be a very wise decision. A higher quality device will likely last longer and perform more consistently over time, which is pretty important for regular use.
Portability Matters
Are you planning to take your grinder and roller with you on the go? If so, size and weight are very important considerations. Compact, lightweight models that fit easily into a pocket or small bag are ideal for portability. Some even come with built-in storage for papers or a small amount of material, which is incredibly convenient. If it's primarily for home use, then size might be less of a concern, and you could opt for a larger, perhaps more robust, model.
Material and Durability
The material the combo is made from plays a big role in its durability and how it feels to use. Common materials include aluminum, plastic, and sometimes wood. Aluminum grinders are generally very durable and provide a smooth grinding action. Plastic options are often lighter and more affordable, but might not last as long with heavy use. Wooden ones can be quite stylish but might require more care. Think about how much wear and tear your tool will experience and choose a material that can stand up to it, you know.
Ease of Use and Features
Some models are incredibly simple to operate, while others might have a few more steps or features. If you're new to rolling or prefer a very straightforward process, a simpler design might be best. If you enjoy tinkering or want more control over the process, a model with adjustable settings or additional compartments could be appealing. Consider the type of grinding teeth, too; some are designed for a coarser grind, others for a very fine one. Look for features that genuinely add value to your experience, as a matter of fact, rather than just being gimmicks.
Cleaning and Maintenance
All tools need cleaning eventually, right? Think about how easy the device is to disassemble and clean. Models with fewer nooks and crannies are generally easier to maintain, which can save you time and effort in the long run. Regular cleaning helps ensure your grinder and roller continue to perform well and, you know, prevents buildup that could affect the taste or consistency of your material. A tool that's easy to keep clean will likely be used more often and last longer.
Price Point
Finally, consider your budget. Joint roller and grinder combos come in a wide range of prices. While it's tempting to go for the cheapest option, remember that quality often correlates with price. Sometimes, spending a little more upfront for a well-made device can save you money in the long run by avoiding the need for frequent replacements. However, there are also many excellent mid-range options that offer a great balance of quality and affordability. It's about finding that sweet spot that meets your needs without breaking the bank, you see.
Keeping Your Tool Clean
Keeping your joint roller and grinder clean is, honestly, a very important part of making sure it works well and lasts a long time. Over time, material can build up in the grinding teeth and on the rolling surfaces. This buildup, you know, can make the device harder to use, less efficient, and might even affect the quality of your prepared material. A clean tool, just like a well-maintained joint in your body, functions much more smoothly, as a matter of fact.
Regular Light Cleaning
For everyday maintenance, a quick brush-off can go a long way. After each use, or perhaps every few uses, take a small brush—like a stiff paintbrush or even a dedicated cleaning brush that sometimes comes with the device—and brush away any loose material from the grinding teeth and the rolling mechanism. This prevents buildup from becoming caked on, which is much harder to remove later. It's a simple step, but it really helps keep things running smoothly, you know.
Deeper Cleaning
Every now and then, your combo unit will need a more thorough cleaning. The frequency depends on how often you use it, but perhaps once a week or every couple of weeks for regular users is a good idea. First, disassemble your grinder and roller as much as possible. Most models can be taken apart into a few main pieces, which is pretty convenient. This allows you to access all the nooks and crannies where material might be stuck.
For metal or plastic parts, you can often use isopropyl alcohol. Soak the parts in a container of isopropyl alcohol for about 15-30 minutes. The alcohol will help dissolve any sticky residue. After soaking, use a small brush or a cotton swab to scrub away any remaining bits. For very stubborn spots, a toothpick or a small, blunt tool can help dislodge material from tight spaces. Make sure to rinse all the parts thoroughly with warm water after cleaning to remove any alcohol residue, which is a very important step.
For wooden components, if your device has any, avoid soaking them in alcohol or water, as this can damage the wood. Instead, gently wipe them down with a slightly damp cloth, and perhaps use a dry brush to remove any material. Always let all parts dry completely before reassembling your device. This prevents rust on metal parts and, you know, ensures everything functions correctly.
Tips for Maintenance
Beyond cleaning, a few other habits can help maintain your tool. Avoid grinding very wet or sticky material, as this is more likely to cause buildup and make cleaning difficult. Store your joint roller and grinder in a clean, dry place to prevent dust accumulation and potential damage. Some people also apply a tiny bit of food-grade lubricant to the moving parts of their grinder, like the threads, to ensure a very smooth twisting action, which can be helpful. By taking these simple steps, you'll ensure your joint roller and grinder remains a reliable and efficient part of your routine for a long time, as a matter of fact. It’s about giving your tool the care it needs, just like you would care for the joints in your own body to keep them flexible and moving well.
Common Questions About Joint Rollers and Grinders
Are combined joint roller and grinder units good for beginners?
Yes, absolutely, they tend to be very good for beginners, you know. The main reason is that they simplify the whole process. Instead of learning how to use two separate tools and then trying to coordinate them, everything is integrated into one device. This reduces the learning curve significantly. Beginners can focus on getting the feel of grinding and then immediately move to rolling without much fuss, which can be less intimidating. It's a pretty straightforward way to start, as a matter of fact.
How long do joint roller and grinder combos typically last?
The lifespan of a joint roller and grinder combo really varies, actually, depending on a few things. The material it's made from is a big factor; metal ones, especially aluminum, tend to last much longer than plastic ones, sometimes for many years with proper care. How often you use it also plays a role, of course. Regular, heavy use will naturally cause more wear and tear. But, honestly, with good cleaning habits and not overfilling or forcing the grinder, even a moderately priced metal unit can give you solid performance for a long time, which is pretty good value.
Can I use any type of rolling paper with these devices?
For the most part, yes, you can use most standard rolling papers with these devices, you know. Most joint rollers are designed to accommodate common paper sizes, like 1¼ or king size. However, some very thin or very thick papers might behave a little differently in the roller, or perhaps some specialty papers with unusual dimensions might not fit perfectly. It's always a good idea to check the product specifications if you have a particular paper type you prefer. But generally, the vast majority of papers available will work just fine, as a matter of fact.
Learn more about rolling techniques on our site, and link to this page for more grinder care tips.
For further reading on the science behind material preparation, you might find this resource helpful: National Center for Biotechnology Information.
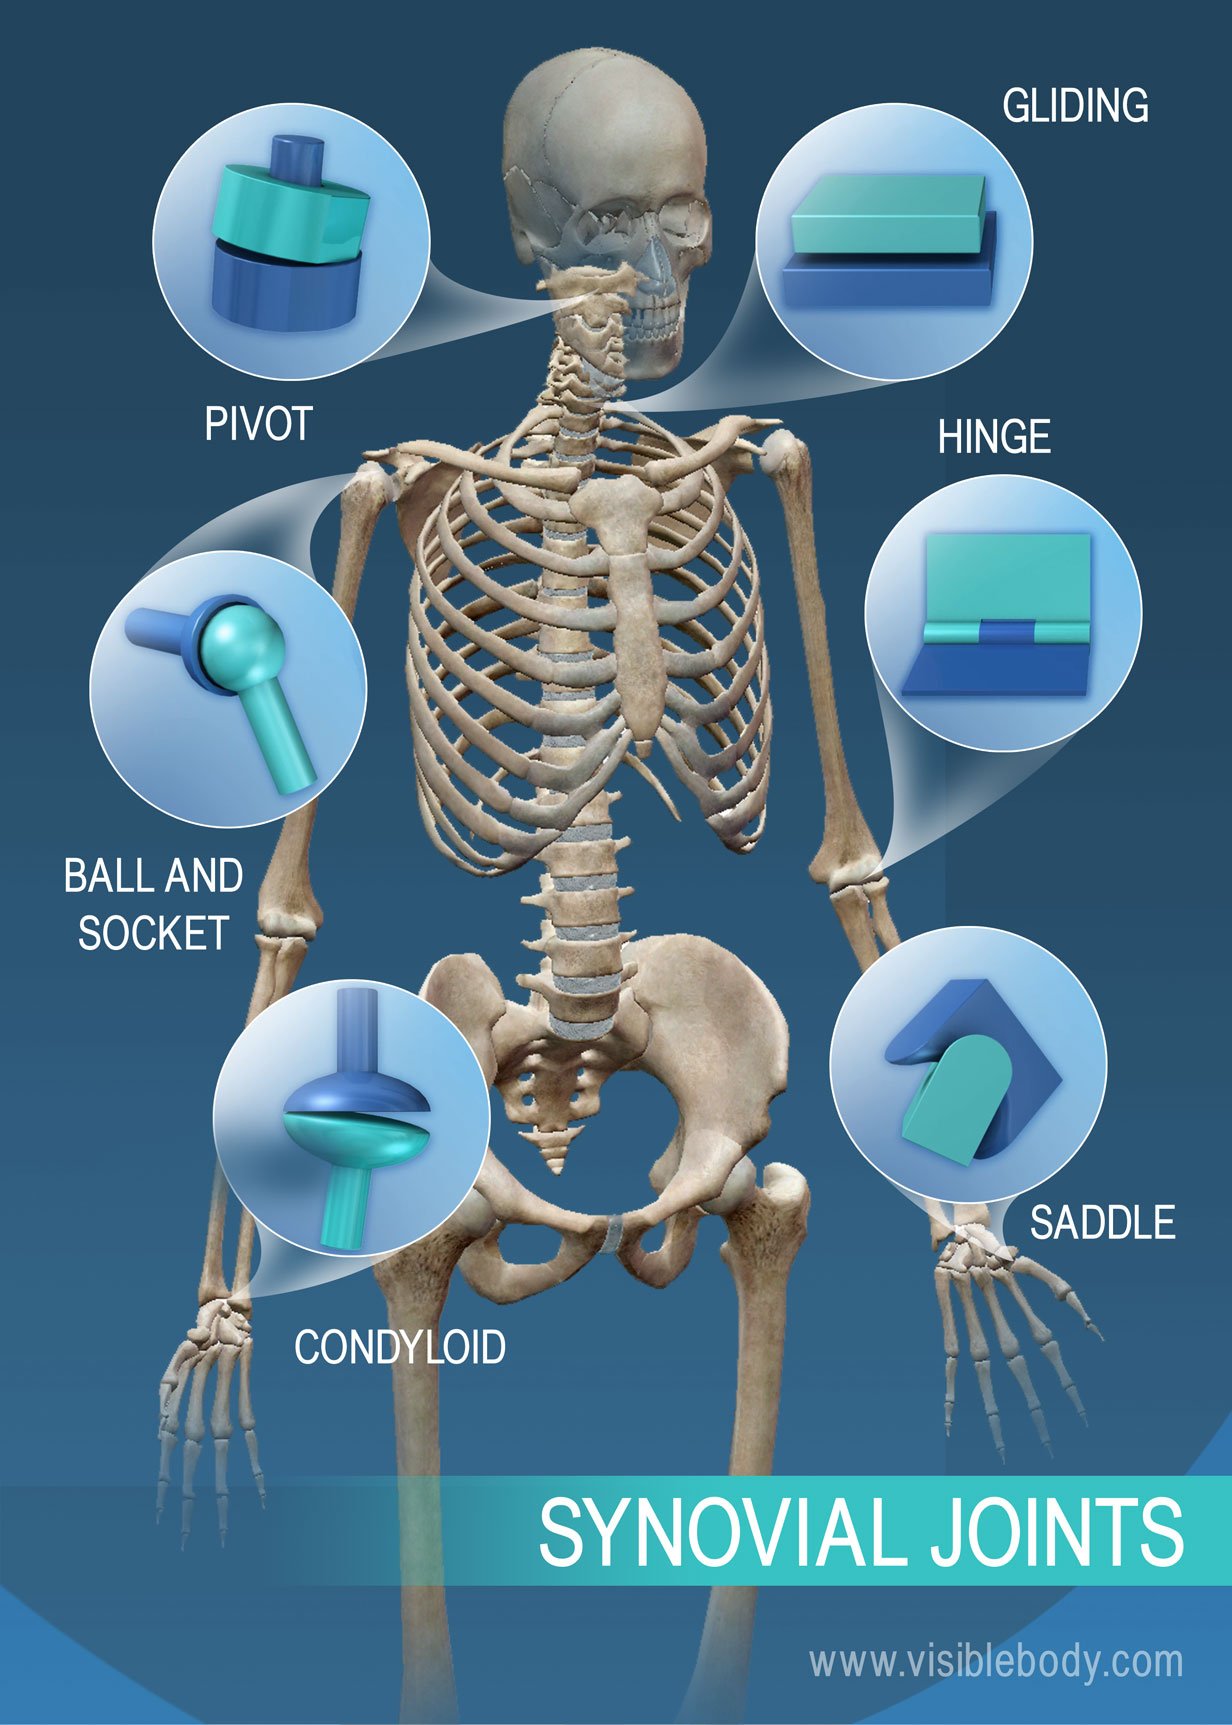
Joints and Ligaments | Learn Skeleton Anatomy
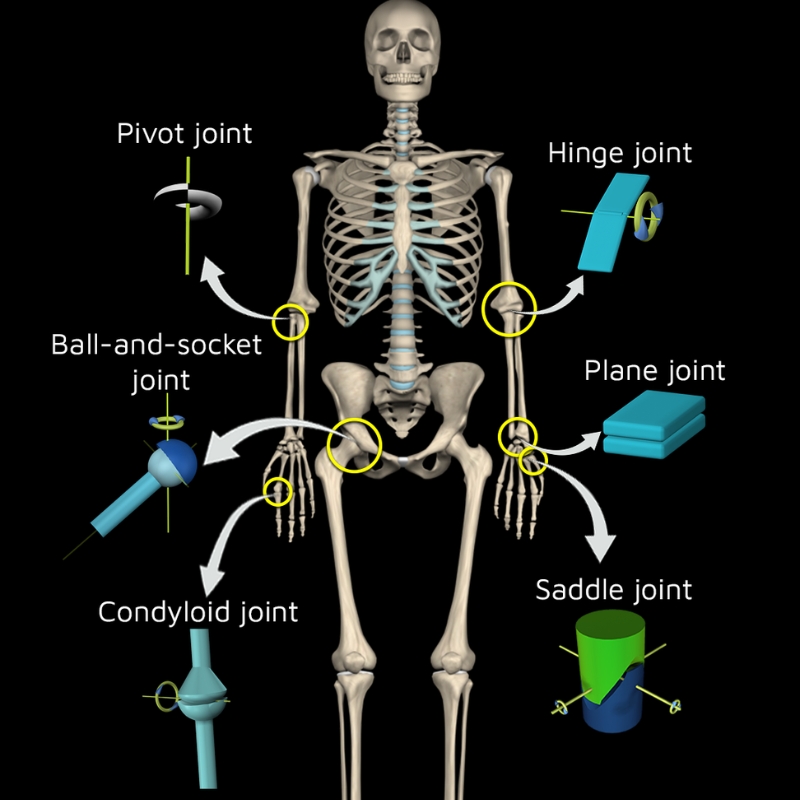
Types of Joints: A Detailed Classification Guide Muscle and Motion

Synovial Joint Anatomy | BioRender Science Templates
